

Damaged Parquet Floor Repair: A Professional Guide to Restoration
- Jun 18
- 13 min read
Is that "clicking" sound under your feet or a stubborn gap between blocks telling you your floor is failing? Many homeowners assume that once a floor starts to lift or reveals a messy layer of black bitumen, the only option is to cover it up. However, a damaged parquet floor repair is often more of a restoration puzzle than a demolition job. You likely value the history of your home and want to preserve its character, but those missing sections from old plumbing work or loose blocks are hard to ignore.
We believe that every parquet floor has the potential to be a masterpiece once again. In this guide, we'll show you how to identify specific damage, choose heritage-correct materials, and decide when it's time to call in a professional. You'll learn the secrets to achieving a stable, level surface with a seamless pattern that's built to last another fifty years. We will explore the technical side of subfloor preparation, the removal of old adhesives, and the meticulous craft of gap filling to ensure your restoration is both beautiful and permanent.
Key Takeaways
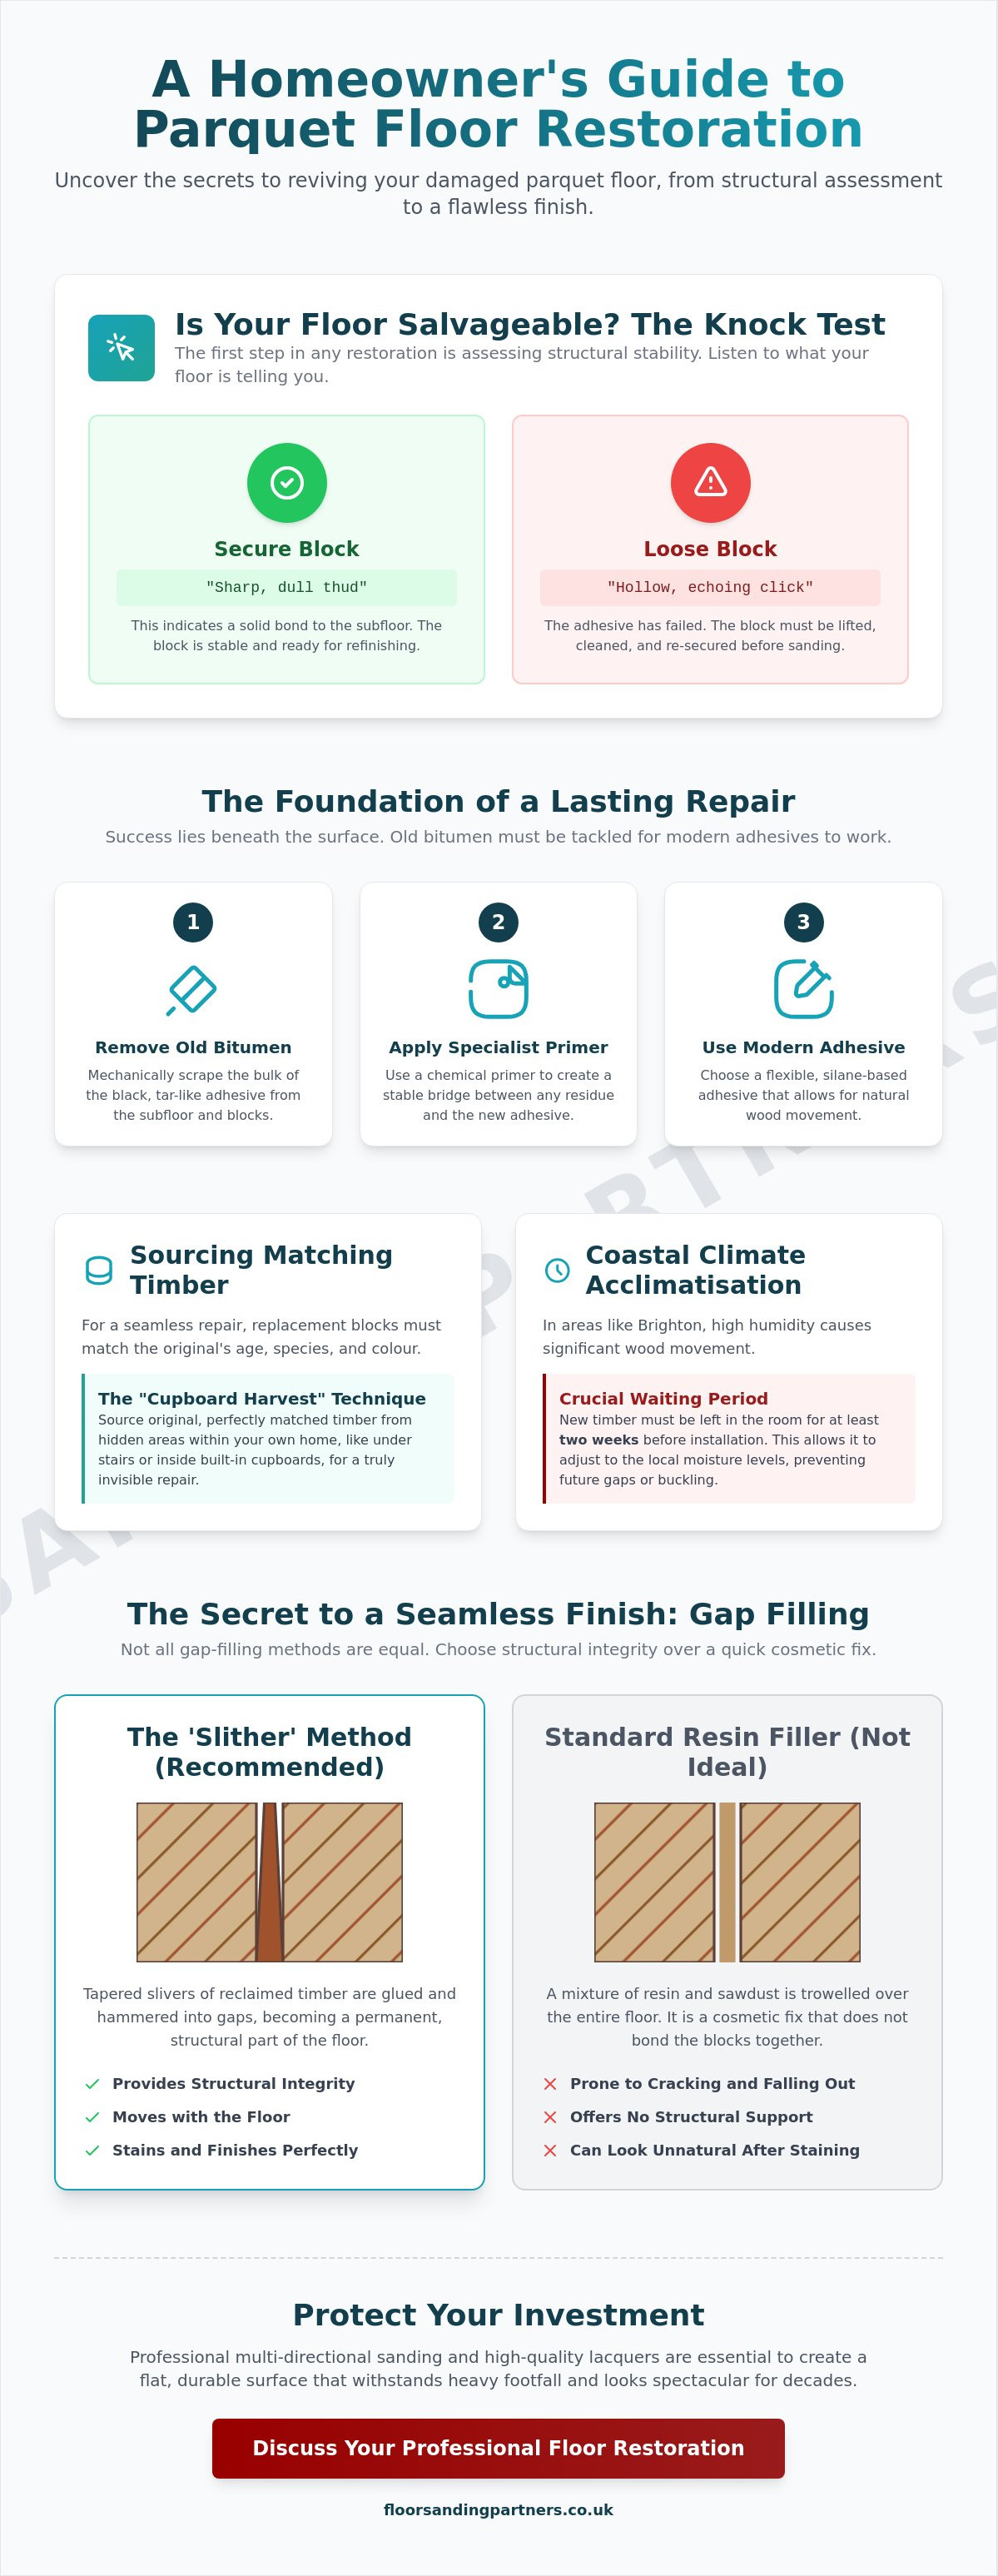
Learn how to use the "Knock Test" to identify structural instability and loose blocks before you begin any aesthetic restoration work.
Understand the vital role of subfloor preparation and why clearing old bitumen is essential for a successful damaged parquet floor repair.
Discover the "Cupboard Harvest" technique for sourcing original, matching timber from within your own home for a perfectly seamless finish.
Explore why the "Slither" method of gap filling using tapered wood slivers provides better structural integrity than standard resin fillers.
Find out why multi-directional sanding and high-quality lacquers are necessary to protect your floor against the heavy footfall of busy Brighton hallways.
Table of Contents
Assessing Damaged Parquet: Is Your Floor Salvageable?
Before we even pick up a sander, we must look at the foundation. A successful damaged parquet floor repair is not merely an aesthetic fix; it's a process of structural stabilisation. We define true repair as the securing of every individual timber block to the subfloor before any refinishing begins. If the blocks aren't stable, the finest lacquer in the world won't prevent the floor from failing within months. Historically, Parquet flooring was a hallmark of craftsmanship in grander homes, and our goal is to respect that heritage by ensuring the floor is as solid as the day it was laid.
How do you know if your floor is a candidate for restoration? We use the "Knock Test". By gently tapping across the surface with your knuckles or a small wooden mallet, you can hear the difference between a solid bond and a failure. A sharp, dull thud indicates a secure block. A hollow, echoing "click" tells us the adhesive has failed. If you can see the blocks moving when you walk over them, the repair becomes a priority to prevent the timber from cracking under pressure.
We often encounter floors hidden under decades of carpet. This usually reveals the dreaded "carpet gripper" holes around the perimeter. Whilst these look like deep wounds, they are often repairable with the right fillers. Deep gouges and water stains from old radiator leaks are more complex. If the timber is black throughout its thickness, it may need replacing. However, we only suggest a full "walk away" if we find evidence of dry rot or a complete subfloor collapse. In most cases, even a tired floor has plenty of life left if handled with a safe pair of hands.
Common Parquet Patterns and Their Repair Complexity
The geometry of your floor dictates the difficulty of the repair. Herringbone and Chevron patterns require incredible precision; if one block is slightly out of alignment, the entire room's "run" will look crooked. Finger or mosaic parquet is often much thinner, meaning we have less timber to work with during the sanding phase. Versailles panels are the most complex of all. These large, intricate squares often require us to source specific reclaimed sections to match the original grain and species exactly.
The Impact of Coastal Humidity in Brighton
Living in Brighton and Hove brings unique challenges for timber. The salty sea air and high humidity levels mean that wood here expands and contracts more than it might in a drier, inland environment. We often see salt-related degradation on the surface of older Sussex floors where the finish has "clouded" over time. Because of this movement, any replacement blocks we source must undergo a period of acclimatisation. We leave the timber in your home for at least two weeks so it can settle into the local moisture levels before we fix it permanently in place.
Preparing the Subfloor: The Bitumen and Loose Block Challenge
The success of a damaged parquet floor repair often depends on what you cannot see. Whilst the surface gets all the attention, the subfloor is where the real structural work happens. In many older Brighton homes, you will find a layer of black, tar-like substance known as bitumen. This was the industry-standard adhesive for decades, but it presents a significant hurdle for modern restoration. Modern, high-performance adhesives simply will not bond to old, oily bitumen. If you try to glue new timber directly onto it, the bond will fail as soon as the central heating kicks in or the seasons change.
Following professional standards for preserving historic wood floors requires a meticulous approach to cleaning. You must remove as much residue as possible. We use specialist scrapers to clear the bulk of the tar, followed by a chemical primer that creates a "bridge" between any remaining bitumen and our new adhesive. We favour silane-based adhesives over traditional PVA. Silane stays flexible once cured, allowing the timber to breathe and move slightly without snapping the bond. This is particularly important in coastal areas where humidity fluctuations are common.
Removing and Cleaning Loose Blocks
When we lift loose sections, we always number the blocks on their underside. Parquet is a giant, hand-cut puzzle; if you lose the original order, the geometric alignment will be lost. Every block must have its edges cleaned back to the bare wood. Even 1mm of old debris or grit left on the side of a block will "shunt" the pattern across the room. By the time you reach the far wall, your herringbone or chevron lines will be noticeably crooked. Safety is also a priority here. Some very old black mastics used in the early 20th century contained low levels of asbestos. If you encounter a greyish, fibrous residue, it is vital to have it tested before you begin scraping.
Stabilising the Foundation
Before relaying the blocks, we must ensure the foundation is rigid and dry. A moisture meter is a non-negotiable tool in our kit. We look for a subfloor moisture content of less than 12% to prevent future warping. If the underlying floorboards are "bouncy," we secure them with countersunk screws to create a rock-solid base. Once the subfloor is level and primed, the blocks can be set back into place. For homeowners who feel this technical stage is a bit daunting, our team provides expert Parquet Floor Restoration to ensure your floor's foundation is built to last another lifetime.
Sourcing and Replacing Missing Parquet Blocks
Finding the right timber is often the most time-consuming part of a damaged parquet floor repair. You cannot simply pop to a local DIY store and buy a few blocks that will match a floor laid in the 1930s. The wood species, the cut of the grain, and even the base dimensions have changed significantly over the decades. One of our favourite techniques for a truly invisible fix is the "Cupboard Harvest". We often look inside under-stairs cupboards or pantry areas where the original parquet might be hidden under lino. Since this wood came from the same batch as your main floor, the match is guaranteed to be perfect once it is cleaned and relayed.
If your home has no hidden reserves, we turn to specialist reclamation yards across Sussex. Hunting for matching blocks requires a keen eye for detail. You aren't just looking for the right colour; you are looking for the right growth rings and density. A common pitfall for the unwary is the shift from Imperial to Metric measurements. A vintage block is typically 9 inches by 3 inches, whereas modern equivalents are sold in millimetres. Even a tiny discrepancy of 2mm means the new block won't sit flush within the existing pattern. We precision-trim every replacement to ensure the geometric lines of your herringbone or chevron remain unbroken and tight.
Identifying Your Wood Species
Brighton’s period properties typically feature European Oak, though we occasionally find Sapele, Mahogany, or Teak in high-end Edwardian builds. Identifying the species correctly is vital because different woods react differently to stains and oils. We follow industry-accepted standards for wood flooring to ensure the new timber is compatible with the old. We also consider the patina. Old wood has "tanned" naturally over fifty years. Whilst new wood will look lighter initially, we can use our expertise to predict how it will settle and age alongside its neighbours.
Fitting the Replacements
Once we have sourced the timber, we "dry-fit" every piece. This involves placing the block without any adhesive to check the height and alignment. We use the "measure twice, cut once" rule to ensure the pattern continuation is flawless, especially at the edges of the room where the border meets the main field. After applying the silane-based adhesive we discussed in the subfloor section, we use a weighted setting technique. By placing heavy, flat weights on the newly fixed blocks for several hours, we ensure they bond perfectly level. This prevents any "proud" edges that could be caught by the sander in the next stage of the restoration.
Sanding and Gap Filling: The Secret to a Seamless Finish
Once the structural work is complete and your blocks are firmly set, the transformation truly begins. Sanding a parquet floor is far more demanding than working with standard pine boards. Because the grain in a herringbone or chevron pattern runs in multiple directions, a traditional "with the grain" approach is impossible. This is why a professional damaged parquet floor repair requires a specialised multi-directional sanding technique. We use a methodical grit progression, starting with a coarse 36-grit to level the surface and moving through to a 120-grit for a furniture-grade finish that feels like silk underfoot.
We understand that the thought of sanding often brings fears of fine dust coating your entire home. To alleviate this, we invest in advanced dustless technology. Our machines are fitted with high-capacity vacuums that capture the vast majority of airborne particles at the source. This ensures your Brighton property remains clean and liveable whilst we restore your floor to its former glory. It is this attention to detail that separates a quick fix from a professional restoration.
Why Wood Slithers Beat Resin Fillers
Many general contractors suggest mixing sanding dust with resin to fill gaps. Whilst this is a quick fix, it often fails in parquet floors. Parquet has a high density of joints; as the timber naturally expands and contracts with the seasons, resin becomes brittle and eventually cracks or falls out. We prefer the "slither" method. This involves glueing tapered wood slivers of matching timber into the gaps. Because it is real wood, it moves in harmony with the floor and provides a structural, invisible repair that lasts decades. This commitment to longevity is a hallmark of Professional Floor Sanding in Brighton and Hove.
The Sanding Process for Parquet
To achieve a perfectly level surface, we follow the 45-degree rule. By sanding across the grain at an angle, we can flatten uneven blocks without gouging the timber. Once the main field is level, we switch to specialised edging machines to reach the corners and borders where the large drum sander cannot reach. The final stage involves "Trio" sanding. This three-disc rotary machine removes any microscopic scratches left by previous passes, leaving the wood perfectly prepared for its final finish. If you want a floor that looks seamless and stands the test of time, our specialised Gap Filling Using Wood Slithers is the essential final touch for any restoration project.
Professional Restoration in Brighton: Why Expert Intervention Pays Off
Restoring a historic floor is a significant investment in your home's heritage. Whilst a DIY approach might seem tempting for a minor damaged parquet floor repair, the complexity of these floors often requires a "safe pair of hands". With over 18 years of experience specialising in Sussex period properties, we've seen how easily a beautiful floor can be ruined by improper sanding or the wrong adhesive. Parquet isn't just a floor; it is a structural puzzle that requires a specialist's eye to ensure the pattern remains crisp and the blocks stay secure for another half-century.
Choosing a local, family-run business means you get a level of accountability and care that larger franchises often lack. We take immense pride in our craft. We also know that a perfectly restored floor can significantly increase the market value of a Brighton property. Buyers in our area actively look for original features like herringbone or chevron oak. Presenting them with a stable, level, and beautifully finished floor is a powerful selling point that reflects the care you've put into the entire building.
Choosing the Right Finish for Your Lifestyle
The final finish is your floor's primary defence against the elements. We offer several options tailored to the specific needs of Brighton homes:
Lacquers: These provide a hard-wearing, protective shield. They are the best choice for busy hallways where pets and children bring in grit and moisture from the beach.
Hard-wax oils: These offer a more natural, matte appearance that enhances the wood grain. The primary benefit is that they are easy to spot-repair in the future without needing to sand the entire room.
Colour matching: We use professional-grade stains to unify the "Cupboard Harvest" blocks we discussed in previous sections with your original timber. This ensures the repair is completely invisible.
Maintaining Your Restored Floor
Once the restoration is complete, proper aftercare is vital. The biggest mistake homeowners make is using a traditional "bucket and mop" technique. Excessive water is the enemy of timber. It can cause blocks to swell and lift, undoing all our hard work. Instead, use a damp microfibre cloth and a specialist wood cleaner. We also recommend placing felt pads under all furniture legs and using rugs in high-traffic entryways to prevent scratches. If you are ready to salvage your historic timber, you can contact Floor Sanding Partners for a Brighton assessment to see how we can bring your floor back to life.
Bringing Your Brighton Heritage Back to Life
Restoring a historic floor is about more than just aesthetics; it is about preserving the structural integrity and character of your home. We've explored how a successful damaged parquet floor repair relies on meticulous subfloor preparation and the removal of old bitumen. By choosing heritage-correct techniques like wood slither gap filling and sourcing matching timber through a "Cupboard Harvest", you ensure a finish that looks original and lasts for decades. These methods provide the stability that modern resin fillers simply cannot match.
Whilst a failing floor can feel like a burden, the right techniques can turn it back into a masterpiece. As a family-run business based in Brighton and Hove, we bring over 18 years of specialist wood floor experience to every project. We are experts in traditional wood slither gap filling and understand the unique challenges of Sussex period properties. You don't have to live with loose blocks or unsightly gaps. We are here to guide you through every stage of the restoration process with transparency and care.
Ready to see your floor transformed? Book Your Expert Parquet Restoration Assessment in Brighton today. We look forward to helping you rediscover the hidden beauty beneath your feet.
Frequently Asked Questions
How much does it cost to repair a damaged parquet floor in Brighton?
Restoration costs vary depending on the room size and the extent of the structural damage. Industry data from June 2026 suggests the average cost to restore a wooden floor in a medium-sized room is approximately £240. For professional sanding and refinishing, you can expect an average rate of £42 per square metre. Local factors in Brighton, such as the need for extensive bitumen removal or subfloor damp proofing, will influence the final cost of the project.
Can I repair loose parquet blocks myself?
You can repair a single loose block if you have the correct tools, but widespread instability often signals a deeper subfloor issue. A successful damaged parquet floor repair requires the complete removal of old adhesives and the use of flexible silane-based glues. If you don't address the underlying cause of the movement, the blocks will likely lift again. For a result that lasts another fifty years, professional intervention is usually the safest path.
How do I remove black bitumen from the back of parquet blocks?
The most effective method is to use a specialist sharp-edged scraper to clear the bulk of the residue from the timber. You don't need to remove every microscopic trace, but the surface must be flat and clean enough for modern primers to bond. Avoid using heat guns or harsh chemical strippers, as these can soak into the wood and prevent new adhesives from curing properly. Always check for asbestos if the adhesive appears fibrous.
How long does a parquet floor restoration typically take?
Most professional restoration jobs for a medium-sized room are completed in about one to two days. This timeline includes the structural repairs, multi-directional sanding, and the application of the initial finish coats. However, if your floor requires significant block replacement or extensive gap filling with wood slithers, the process may take slightly longer. This allows for the proper curing of adhesives and the acclimatisation of any new timber sections introduced to the pattern.
What is the best way to fill gaps in an old parquet floor?
Using tapered wood slivers, often called "slithers," is the superior method for filling gaps in parquet. Unlike resin fillers that crack as the floor moves, these timber strips are glued into the gaps and sanded flush. This creates a permanent, structural repair that matches the grain of your existing floor. It is a meticulous process, but it prevents the "plastic" look of resin and ensures a seamless finish that stands the test of time.
Can I change the colour of my parquet floor during the repair process?
Yes, you can certainly change the colour of your floor by applying a professional-grade wood stain after the sanding stage. Whether you want to unify new and old timber or completely refresh the look of your Brighton hallway, staining allows for deep customisation. We follow the sanding process with a trial patch so you can see exactly how the chosen pigment reacts with your specific wood species before we commit to the final finish.
Why is my parquet floor lifting or clicking when I walk on it?
Lifting or clicking usually indicates that the original bitumen adhesive has become brittle and lost its bond with the subfloor. This movement is often exacerbated by seasonal humidity changes or old leaks that have caused the timber to expand and contract. If left unaddressed, the friction between loose blocks will eventually cause the wood to crack. Identifying these hollow spots early using the "Knock Test" prevents more costly structural damage to your home.
Is dust-free floor sanding really possible for parquet floors?
Modern restoration techniques make virtually dust-free sanding a reality for parquet floors. We use high-performance machines equipped with integrated vacuum systems and HEPA filters that capture the vast majority of airborne particles. This means you don't need to worry about fine dust settling in your cupboards or curtains. It's a much cleaner, safer process that allows us to maintain a professional standard in your home whilst protecting your indoor air quality during the restoration.


Comments